i know the rest of the blogging world has apparently moved on.
freezer paper and an exacto knife are sooo 2010.
if you want to create a personalized shirt anymore—you bust out your cricut or your silhouette or your whatever personal electric cutter and make lines so crisp and letters so straight you could…
well, i don’t know what you could do. but it would be impressive, i’m sure.
not all of us are there though. some of us still kick it old-school.
sharpie, freezer paper and exacto knife baby.
a blank tee is my canvas, and the world is my oyster.
 especially when that blank tee was like $1 at walmart (yes, the tag says $3, but i think i paid $1)
when i saw this quote floating around the interwebs, i knew it would be the perfect shirt for little man…
especially when that blank tee was like $1 at walmart (yes, the tag says $3, but i think i paid $1)
when i saw this quote floating around the interwebs, i knew it would be the perfect shirt for little man…
 i’d love to stay, but i really mustache! ("must dash", in case you're like googiedaddy. man has no vision sometimes.) ha! hahaha! that makes me laugh. it makes me laugh in a way that makes my whole belly shake and five probably thinks there’s an earthquake or a tsunami or something.
anyway…
i took a piece of freezer paper the size of the area i wanted to cover, folded it find the center, and just free-handed my lettering & mustache.
then i cut it all out and ironed the freezer paper down.
i’d love to stay, but i really mustache! ("must dash", in case you're like googiedaddy. man has no vision sometimes.) ha! hahaha! that makes me laugh. it makes me laugh in a way that makes my whole belly shake and five probably thinks there’s an earthquake or a tsunami or something.
anyway…
i took a piece of freezer paper the size of the area i wanted to cover, folded it find the center, and just free-handed my lettering & mustache.
then i cut it all out and ironed the freezer paper down.
 hit it with some black fabric paint…
 and the big reveal…(i LOVE the big reveal)
 to give it a little more something, i used the red fabric paint pen that i used to make little man’s woody shirt and added a bit of crazy detail…
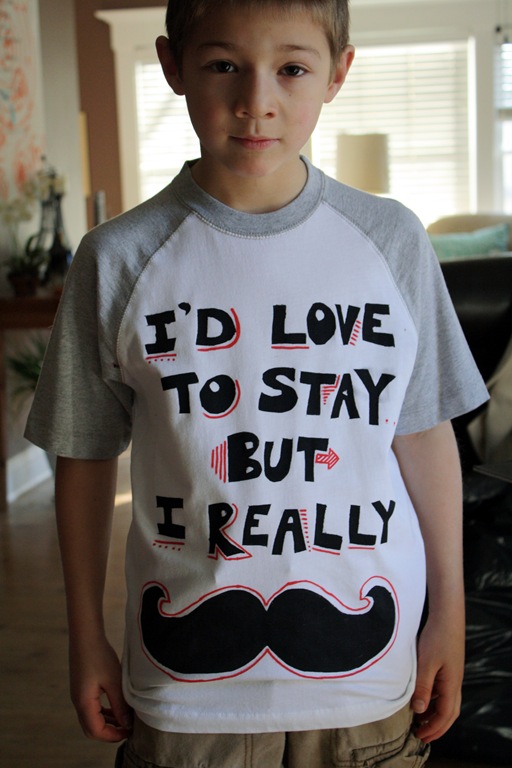 and there you have it. doesn't get much easier than that. no electronic devices necessary.
(and despite his serious face, he actually quite loved the shirt. i guess maybe the whole "mustache" thing requires a more upscale and staid personality than my typical crazy little man)
and there you have it. doesn't get much easier than that. no electronic devices necessary.
(and despite his serious face, he actually quite loved the shirt. i guess maybe the whole "mustache" thing requires a more upscale and staid personality than my typical crazy little man)

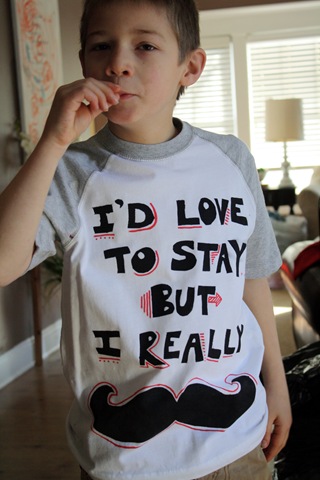
(he’s twirling his imaginary mustache, can’t you tell?)
i'm linking this up here today:


 http://todayscreativeblog.net/


another week, another snow day.
that’s pretty much how it feels—at least here in the northeast.
but it’s okay, because i use my snow days to get important things done.
wait, what? were you thinking things like deep cleaning and reorganizing?
haha.
you’re cute.
no. when the googiedaddy is stuck home due to snow, i hop out of bed and say “pull the bed out. today i’m painting the wall behind it. i saw it on a blog.”
this wall:
 stop laughing at my elephant. it’s a cool mist humidifier and it saves my life nightly. i have pregnant nose for cryin’ out loud.
needs something, right? (besides having the bed made. but when i get an idea in mind i GOGOGOGO. no time for such trivialities.)
so i knew when i saw this tutorial from centsational girl it was the perfect thing. it’s been in my “ideas” file forever. i’ve even had the paint forever. it was time to get ‘er done.
she used poster board to create her stencil, then traced it in pencil and free-hand painted the entire thing.
but i had something else in mind…
i found a pattern i liked and printed it out:
stop laughing at my elephant. it’s a cool mist humidifier and it saves my life nightly. i have pregnant nose for cryin’ out loud.
needs something, right? (besides having the bed made. but when i get an idea in mind i GOGOGOGO. no time for such trivialities.)
so i knew when i saw this tutorial from centsational girl it was the perfect thing. it’s been in my “ideas” file forever. i’ve even had the paint forever. it was time to get ‘er done.
she used poster board to create her stencil, then traced it in pencil and free-hand painted the entire thing.
but i had something else in mind…
i found a pattern i liked and printed it out:
 i do all my best planning in bed. a blessing on whoever invented wireless printers.
then i took my printout and put it behind my “stencil medium” and traced.
i do all my best planning in bed. a blessing on whoever invented wireless printers.
then i took my printout and put it behind my “stencil medium” and traced.
 you’re wondering what it is, aren’t you?
shhh…come ‘ere…closer…
it’s a flexible cutting board from the $1 store. actually, they were 2 for $1, so it was really only 50 cents. it came to me in a burst of inspiration.
it was perfect—cut easily with an xacto knife…
you’re wondering what it is, aren’t you?
shhh…come ‘ere…closer…
it’s a flexible cutting board from the $1 store. actually, they were 2 for $1, so it was really only 50 cents. it came to me in a burst of inspiration.
it was perfect—cut easily with an xacto knife…
 and cleaned up easily too.
so now, through the magic of internet, you don’t have to see the 45 minute “break” i took from my project to clean behind our bed. let’s just say: a bag of miscellaneous trash, enough dust bunnies to start a dust bunny farm, and at least 20 hairbands that slip off my hair every night while i sleep and i can’t find in the morning. and here i thought i was a relatively clean person. i should have known better. i’ve been down this road before.
ahem. so, moving on:
once my stencil was ready and the bed pulled away from the wall to reveal pristine spotlessness, i began the process.
my other supplies: a wet rag for cleanups, a decent paint brush, masking tape to hold the stencil in place, and the paint. i used a 50/50 blend of these 2 colors:
and cleaned up easily too.
so now, through the magic of internet, you don’t have to see the 45 minute “break” i took from my project to clean behind our bed. let’s just say: a bag of miscellaneous trash, enough dust bunnies to start a dust bunny farm, and at least 20 hairbands that slip off my hair every night while i sleep and i can’t find in the morning. and here i thought i was a relatively clean person. i should have known better. i’ve been down this road before.
ahem. so, moving on:
once my stencil was ready and the bed pulled away from the wall to reveal pristine spotlessness, i began the process.
my other supplies: a wet rag for cleanups, a decent paint brush, masking tape to hold the stencil in place, and the paint. i used a 50/50 blend of these 2 colors:
 decoart dazzling metallics champagne gold, and folkart metallic pearl white
next followed some suggestions from googiedaddy: “maybe you should measure the wall and/or stencil before you start so you know where it will end. or how big to make it.”
what.eh.ver.
let me just tell you something right now. any fairly consistent reader of googiemomma probably already knows my feelings on this, but i’ll break it down for ya.
decoart dazzling metallics champagne gold, and folkart metallic pearl white
next followed some suggestions from googiedaddy: “maybe you should measure the wall and/or stencil before you start so you know where it will end. or how big to make it.”
what.eh.ver.
let me just tell you something right now. any fairly consistent reader of googiemomma probably already knows my feelings on this, but i’ll break it down for ya.
 as are levels. and band-aids. and sewing patterns. and the whole concept of ‘planning ahead’ in general.
this is for you, my friends. words to live by.
but then again, i’m all about keeping a happy marriage. so i get a tape measure, measure the wall in both directions, measure the stencil in both directions, get a calculator, and fill an entire page with numbers. and division signs. and multiplication signs. and maybe some square root thingys and some things squared exponentially and i googled the pythagorian theroum just to see if it applied.
then i leave the paper in an obvious spot, where googiedaddy will see it and be all impressed by my vast mathematical skills and forethought.
then i go back to what i was doing--namely, i little thing i like to call “eyeballing”. except now my brain hurts.
as are levels. and band-aids. and sewing patterns. and the whole concept of ‘planning ahead’ in general.
this is for you, my friends. words to live by.
but then again, i’m all about keeping a happy marriage. so i get a tape measure, measure the wall in both directions, measure the stencil in both directions, get a calculator, and fill an entire page with numbers. and division signs. and multiplication signs. and maybe some square root thingys and some things squared exponentially and i googled the pythagorian theroum just to see if it applied.
then i leave the paper in an obvious spot, where googiedaddy will see it and be all impressed by my vast mathematical skills and forethought.
then i go back to what i was doing--namely, i little thing i like to call “eyeballing”. except now my brain hurts.
 i started at the bottom. there is a learning curve, and this area is hidden by the bed.
 and i stenciled. and i stenciled. and then i took a break.
and then i stenciled some more, and cried about my pregnant back, and stenciled.
then i ran out of paint.
day 2, new paint, i got into a groove:
stencil an entire row, wash the stencil, let everything dry. take a few minutes to throw in a load of laundry or load the dishwasher or check email or just sit and whine about my aching back.
then rinse and repeat.
in this way i worked slowly up the entire wall. i skipped areas where my stencil was too big to fit. when i got done all the big areas, i cut my stencil up into little pieces:
and i stenciled. and i stenciled. and then i took a break.
and then i stenciled some more, and cried about my pregnant back, and stenciled.
then i ran out of paint.
day 2, new paint, i got into a groove:
stencil an entire row, wash the stencil, let everything dry. take a few minutes to throw in a load of laundry or load the dishwasher or check email or just sit and whine about my aching back.
then rinse and repeat.
in this way i worked slowly up the entire wall. i skipped areas where my stencil was too big to fit. when i got done all the big areas, i cut my stencil up into little pieces:
 and filled in the holes.
i’m not gonna lie—it was pretty time consuming. and in retrospect i kind of wish i had made my stencil a bit bigger—closer to the size of centsational girl’s.
but the end result~~well, i’m pretty proud of it:
and filled in the holes.
i’m not gonna lie—it was pretty time consuming. and in retrospect i kind of wish i had made my stencil a bit bigger—closer to the size of centsational girl’s.
but the end result~~well, i’m pretty proud of it:
 STOP LAUGHING AT MY ELEPHANT. I CAN HEAR YOU.
okay, okay…i’ll put my best foot forward:
STOP LAUGHING AT MY ELEPHANT. I CAN HEAR YOU.
okay, okay…i’ll put my best foot forward:
 better?
{i’m still searching for a nightstand for my side of the bed. until then i have one of those old sewing machine tables that just about everyone has. and no, we don’t have baseboard or trim in this room yet. hey, it’s only been 5 years. DON’T RUSH US.}
better?
{i’m still searching for a nightstand for my side of the bed. until then i have one of those old sewing machine tables that just about everyone has. and no, we don’t have baseboard or trim in this room yet. hey, it’s only been 5 years. DON’T RUSH US.}
 but i’m really happy with the subtle iridescent pattern. adds just the little somethin’ somethin’ i was looking for.
 once more for emphasis:
BEFORE
once more for emphasis:
BEFORE
 AFTER
AFTER
 i'm sharing this here today:


I know this is late...but my mom called this morning with an emergency.
And by "emergency"...I mean she wanted to go to the flea market. :0)
Part One is how I initially created the chandelier stencil** and made a pillow with it
Part Two is using the 2nd stencil I created to make an earring hanger thingy (totally technical term)
Part Three is about how cheap I am!
Kidding! But seriously, when you put all that effort into cutting out an intricate freezer paper stencil, why throw away the cut out image?
I experimented before with what I'm calling (for lack of a better term) "reverse freezer paper stenciling bleaching". I know, I know...brilliant. Stop, please, I'm blushing.
Here again, to review, is what I started with:
 I did cut out two stencils, which should technically give me two cut-out chandeliers, but the 2nd cut-out image got too messed up to really use for anything. So I had the one good chandelier to iron on something.
"Something" being a shirt from girlfriend girl's drawer. I ironed my chandelier on low and off-set, wrapping it around the side. I used some of the pieces of the 2nd messed up image to extend a "chain" up to the shoulder.
I did cut out two stencils, which should technically give me two cut-out chandeliers, but the 2nd cut-out image got too messed up to really use for anything. So I had the one good chandelier to iron on something.
"Something" being a shirt from girlfriend girl's drawer. I ironed my chandelier on low and off-set, wrapping it around the side. I used some of the pieces of the 2nd messed up image to extend a "chain" up to the shoulder.
 Seriously--I love it like that--almost enough to make me want to cut out more stencils so I can do it in white on a shirt for me.
Put some cardboard inside the shirt, and take the spray bottle with a 50/50 mix of bleach and water outside and start spraying.
Last time I did this it was raining out, so I let the shirt sit for 2 minutes before I rinsed it. This time I did it in the sun, so basically as soon as I finished spraying I ran inside and rinsed it in the sink. (At least this is my working theory on why it seemed to lighten this shirt so much more quickly)
A quick wash & dry and this is what we have:
Seriously--I love it like that--almost enough to make me want to cut out more stencils so I can do it in white on a shirt for me.
Put some cardboard inside the shirt, and take the spray bottle with a 50/50 mix of bleach and water outside and start spraying.
Last time I did this it was raining out, so I let the shirt sit for 2 minutes before I rinsed it. This time I did it in the sun, so basically as soon as I finished spraying I ran inside and rinsed it in the sink. (At least this is my working theory on why it seemed to lighten this shirt so much more quickly)
A quick wash & dry and this is what we have:
 Cute, but it needs more.
So I picked up some iron-on rhinestones to add a little of the "bling" factor. I've been wanting to use these for a while, and with a 40% off coupon from Jo-Ann's I was able to get a pack of 300 in various sizes for about $8.
Cute, but it needs more.
So I picked up some iron-on rhinestones to add a little of the "bling" factor. I've been wanting to use these for a while, and with a 40% off coupon from Jo-Ann's I was able to get a pack of 300 in various sizes for about $8.
 They simply iron on with a dry iron set to the "cotton" setting. I was able to basically lay out the entire design and then just press the whole thing in two passes with the iron.
Final result:
They simply iron on with a dry iron set to the "cotton" setting. I was able to basically lay out the entire design and then just press the whole thing in two passes with the iron.
Final result:
 And on my model:

 (sorry for the overly bright pics...i just don't feel like editing right now...all that flea marketing just wipes a gal out)
I think it was just the right touch! Unfortunately, its now an unseasonal 92 degrees outside. So I guess this shirt will have to wait for a cooler day!
Thus concludes our lesson on how to be
(sorry for the overly bright pics...i just don't feel like editing right now...all that flea marketing just wipes a gal out)
I think it was just the right touch! Unfortunately, its now an unseasonal 92 degrees outside. So I guess this shirt will have to wait for a cooler day!
Thus concludes our lesson on how to be cheap innovative with a freezer paper stencil! Hope you enjoyed it!
If you use this idea for anything you make, please let me know--I'd love to see it!
**I totally wrote "chandelier shtencil" the first time I typed that. And now...well, I can't stop snorting every single time I look at it. Every. single. time. Come on, tell me it doesn't make you laugh? Say it out loud.
I'm linking up to these parties: (click the links for more great projects!)


Yesterday I showed how I created a freezer paper stencil of a chandelier to make a pillow for my room. While I was at it, I cut and stenciled two, because I had another idea.
This is what I started with:

The second stenciled image, a $5 black frame (11x13) from Walmart, and a piece of cotton batting.
I removed the glass from the frame and used the mat to cut a thick piece of cardboard the same size.

Next make a sandwich--cardboard, batting, fabric. I was going to staple this, but the staples poked through the front, so a little duct tape worked just as well. Tape it all down nice and tight.

Put that whole thing into your frame. I used a little more duct tape and a couple staples at this point to help the back stay tightly closed.
Oooh...look how pretty!

But what is it we've made?
Why, a chandelier for your chandelier earrings, of course!
 I'm going to hang this in my closet to hang all my earrings from, and hopefully bring a little organization to that mess!!! (This is why you're seeing a picture of it in front of the window--NOT in my closet. Trust me, the internet is not ready for a picture of my closet)
Although, the more I look at it, I think it's REALLY cute, and may look just as good hanging in the room! (even though my OCD side desperately wants to hang the earringS symetrically...like a real chandelier!)
Okay, that's two down! Two projects from my chandelier stencil! (why do I sound like the Count? TWO! TWO projects done! AH AH AH!!!)
I'm going to hang this in my closet to hang all my earrings from, and hopefully bring a little organization to that mess!!! (This is why you're seeing a picture of it in front of the window--NOT in my closet. Trust me, the internet is not ready for a picture of my closet)
Although, the more I look at it, I think it's REALLY cute, and may look just as good hanging in the room! (even though my OCD side desperately wants to hang the earringS symetrically...like a real chandelier!)
Okay, that's two down! Two projects from my chandelier stencil! (why do I sound like the Count? TWO! TWO projects done! AH AH AH!!!)
Come back tomorrow to see what happened with the cut-out image I had left! Click HERE to see what I did!
Linking up to these parties:
Show and Tell @ Blue Cricket Design
Wednesday Boardwalk Bragfest @ Bobbypins Boardwalk
Idea Sharin Wednesday @ Women Who Do It All
Make It Yours Day @ My Backyard Eden
Penny Pinching Party @ The Thrifty Home
 Also:
Like the rest of blogland, I'm well aware of what today is~~April 7, exactly one year since little Madeline Spohr died. As I sit here in bed snuggling my own 17 month old, (the same age Maddy was when she passed) I think of her family. Yes, Heather, we do hold our children a little tighter when we think of all you've endured. My thoughts are with the family.
Also:
Like the rest of blogland, I'm well aware of what today is~~April 7, exactly one year since little Madeline Spohr died. As I sit here in bed snuggling my own 17 month old, (the same age Maddy was when she passed) I think of her family. Yes, Heather, we do hold our children a little tighter when we think of all you've endured. My thoughts are with the family.


