Showing posts with label refashioning. Show all posts

Tuesday, May 20, 2014

the one with no models: toddler underpants free pattern and tutorial

sharing a post i did back in january for house of estrela's Refashion Month! enjoy!

*-*-*-*-*-*-*-*-*-*-*-*-*-*

 it’s been my m.o. since i started sewing: just the fun stuff. fancy dresses and princess costumes and bowties. occasionally a bag or a stuffed animal.

i’d gloss over those tutorials and patterns for things like basic t-shirts and stretchy pants and jeans and gasp! underwear! who? why? why spend my time on making something i can buy at walmart when i can spend it making fluffy fluffy skirts???

and then i had a moment of clarity, as i prepared to drop yet another $7 pack of  3 pairs of “princess undies” in my cart. i was annoyed—the two little girls basically share clothes, gigi being a peanut and elliot being our typical thick toddler googie—and with potty training in full swing we were going through panties faster than…than i don’t know what. but just way too fast. and $7 every few weeks starts to add up.

meanwhile, back at the ranch…i had an ever increasing backlog of “upcyclable” items—shirts and dresses piling up in drawers and baskets that i figured i’d be able to reuse for a sewing project eventually.

::record scrattttcccchh:: duh.

i pulled that pack o’ panties outta my cart quick as a wink and set off home to make my own.
shockingly, i learned it wasn’t hard at all. (i can hear you experienced sewists rolling your eyes). once i drafted myself a basic pattern and tweaked it a bit, i had four pairs cut and sewn assembly line style in about an hour.

for freeeeeeeee.
which is my favorite number.


also shockingly—those homemade panties are dang cute. and watching their little bums run around in my handmade underpants was rather satisfying, even if it doesn’t get quite the same amount of attention from others that a handmade dress would. (hopefully. truth be told, i have rather exhibitionist daughters. :/  )
i also learned that sewing is sometimes useful for more than just sparkly dresses. it can actually save my family money, instead of being an expensive hobby. lol. i kid. really i’ve always tried to spend very little on my sewing, so it is a cost saving measure for our family. but this opened my eyes to the fact that taking the time to make some of the, ahem, “boring” stuff can really make a dent in our bottom line.

and i’m finally putting some of those knit t’s i’ve been hoarding to good use! upcycling/recycling either your own castoffs or thrifted/gifted items just makes good sense!
so, who’s ready to make their own panties? well too bad, you’re on your own for that. but if you’d like to make a pair that will fit a child between 2-5 depending on their size than i’ve got a free tutorial + pattern for you!

your only supplies are:

+ a pile of knits. somewhere in there try to have a thicker white cotton. i had a rib knit white tank, and this
was perfect as a liner for the crotch. (i just said crotch. on the internet)

+ elastic. i used both F.O.E. (fold over elastic) and regular 1/2” elastic that i have on a big spool. the F.O.E. does look nice and professional, but i found the regular stuff much easier to work with.

+ scissors, thread, machine, pins. what you don’t need is a serger. it’s nice if you have one, but you can do these perfectly well without one.

+ this pattern + this tutorial, over on my blog!

boom. crazy cute panties in multiples.


with cute little bums.


there you have it! go forth and sew more than just the pretties, and save dollah dollah bills ya’ll, and cover nekkid bottoms! (the world will thank you)

IMG_5859_0718

how dare i try and take pictures without letting them be a part? :)
Pin It!

Tuesday, August 20, 2013

one hour chevron maxi dress

i try, you know? i think to myself (actually it’s kind of jeremy’s voice in my head. he’s my jiminy cricket)…you have too much on your plate. you simply can NOT sew all the dresses your children need. in a week. and survive. and feed us. (jeremy’s voice, remember?) you have to accept that you are going to have to go to the store and buy some dresses.

eek.

okay. fine. guinevere needs a dress, and she wants a maxi. off to the store we go.

and then we return--frustrated, annoyed and dress-less. because it seems like everything is either waaaay to short for my leggy girl, or the maxi’s are those shear top layer over a mini underlayer pukeandnothankyou not appropriate and not cute anyway, and then when we finally find one that’s…okay…it’s $35. and in my head i’m tallying the cost of the yard and a half of fabric i’d need and the hour it would take me to make it…and, well.

dress-less we return. you know?

so i balance, carefully—a more involved project one day, a simple sew the next. and in that way i churn through my “to-sew” list, and my children do not have to wear paper bags out of the house, and everyone gets fed at least once a day. #winning

furniture13

this was one of my simple sews—my answer to the overpriced maxi.

furniture6

it’s based off of a design she found online here, which at a mere $209 is just a touch out of our league. <<insert giant shocked eye emoji here>> and okay well i’m just realizing now when looking up that link again that the waistband was stripednot a smaller chevron print. well. humph.

it certainly takes away a bit of the fist-pumping triumph i had in finding coordinating chevron prints: one large scale and one small scale. not that it was exceedingly difficult—both were ordered from girl charlee where they carry enough chevron prints to satisfy even the hardiest of the trend-watching fashionistas.. they really have the best selection of knits around.

i did have one teensy tiny issue. i was a Good Sewer and prewashed the fabrics. i’m learning. but--the smaller chevron print faded. a LOT. like enough that i was going to arrange to send it back. you can see in some of these pics how much less black the waistband is. but guinevere really liked the combo of small and large chevrons. so we kept it. (and take that vineyard vines and your $200 striped-waist-chevron-skirted maxi dress. she likes my mini chevrons.)

furniture1

furniture5

the technical stuff which non-sewers may skip: the top began it’s life as a $3 clearance strapless tube top from walmart. i cut off the bottom 5” and attached the shirred waistband and skirt. the waistband is made of two parts: a regular ungathered underlayer, and the shirred portion was attached over it. the skirt was literally a tube: one seam up the back, hem on bottom. the cut off portion of the top got cut in half and sewn into tubes to become the straps. done and done.

furniture8

because the shirt was meant to be strapless there was elastic all around the top of it. it works nicely to keep the top flush against her chest. and that’s all i have to say about that. O.o

furniture14

saying this dress took me an hour is probably being generous. i didn’t even measure (shocking, i know), just held up the fabric to guinevere’s body and eyeballed. spit-marked, if you will.

furniture10

i need to invest in some more jersey knit. one hour dresses for everybody! ;)

and just for fun (and because i can’t think of a way to end this post), how about some outtakes? this is what happen when i tell neve to stop cocking her head to one side and giving me a half-smile for every shot.

furniture3furniture4

furniture9furniture12

whelp. that should keep the boys away for another few years. my work here is done.

Pin It!

Thursday, June 27, 2013

easy as vintage pie

a couple of months ago melly of the amazing melly sews asked if i would join in the fun of her 30 days of sundresses again this year—and of course i said YES! (SERIOUSLY—the girl is ah-mazing. from her pattern making and publishing, to her techie tutorials and drafting services and sewing abilities and series coordinating…melly, you make me want to be a better person.)

maybe you remember my offering from last year—the lettuce hem maxi dress. it was easy enough…but i wondered if i could do something even easier this time around!

sundress1_edited-1

well looky here. an even easier sundress. and i think i may like it even better than last years (which, as a sidepoint—also the last time i sewed for myself i believe.shameful.)
sundress2

okay, so a lot of us busty gals cry about knits. i know i do! those cute woven shirtdresses are a serious no-go when you’re bigger than a b-cup. but the truth is that knits are a chesty chicks BFF. it’s approximately one bazillion times easier to make something that fits you from knit than woven materials. and if you’re starting with an already made tank? two bazillion times ;)

sundress4

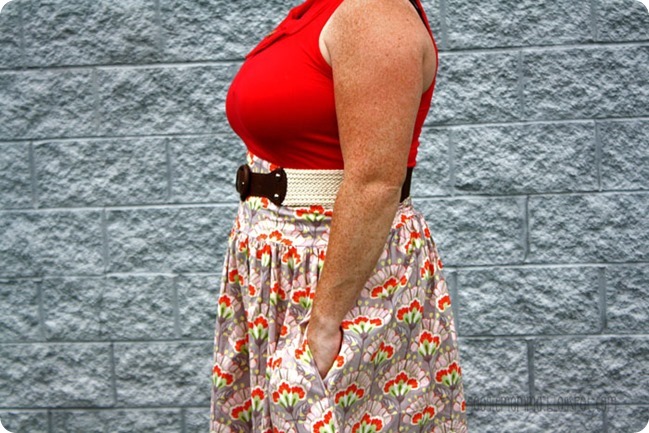
so, that’s what i did. i started with a basic tank. but when it comes to me + dresses + modesty i feel neck showing + shoulders = no bueno. it’s kind of a one or the other thing. why? i dunno. just how i feel. shoulders + neck = hussy. so i hacked off the bottom of my tank and used it to fill in the neck, creating an asymmetrical collar thingy. then i added a new waistband, which i shirred with elastic thread in the back, and a full skirt with pockets. it slips on over my head—no zippers or buttons to worry about, and i can wear it with or without the belt.

basically…i kind of love it.

now of course, as usual, i wanted to take nice bright photos and work up a photographed step by step tutorial…nope. with five kiddos home all day for summer break it’s just not happening. all the sewing is happening at night.

sundress3

and all the finished-product-picture-taking is occurring in the rain. oops.

so i made the executive decision to break out the old drawing skillzzz for this tutorial, which i believe may turn out to be infinitely better. for o1) now i can just sew and take notes and go illustrate later, making the sewing process faster and more enjoyable for moi, and (possibly more importantly) o2) i can illustrate myself with the pouty lips and long luscious eyelashes i’ve always wanted. kiss, kiss. mwah.imagelets get serious: this is crazy stupid easy. from start to finish, with no clear plan (just a vague idea), and taking notes as i went—this took me about 2 1/2 hours.

SUPPLIES
one tank top
2 yards of any kind of matching fabric
coordinating thread and elastic thread
optional: buttons for top and a belt if ya wanna.

image

i used a red $4 tank from old navy, and this super soft “good fortune” by kate spain for moda that i’ve been hoarding for oooh…maybe a year or so! this could easily be modified using a tank with sleeves if you want even more coverage. and this would translate easily into a girl’s dress too!

INSTRUC-TEY-ON-EHS

* i use a 1/2” seam allowance whenever it matters.

slip on your tank and mark with a pin or fabric marker a point under your bust. don’t stretch the tank, just mark where it naturally settles.

image

REMOVE THE TANK before proceeding. <---super important

1/2” below your mark cut the tank off in a straight line.

image

not this crazy wavy line i drew. not sure why i did that.

cut off the hem of the tank also. the hem is lovely, but we don’t need it. discard it. or, ummm…make a bow for your cat.

image

waste not, want not.

take that middle section of your tank and cut it open at one side seam, trimming off the seam/stitching from the area.

image

refold it long ways, right sides together, and stitch the short ends closed. clip the corners and turn it right side out. give it a press. this is now your collar piece.

to attach it to the tank top—start about 1/4 of the way up on one side of the neckline. stretch and pin the new collar piece, right sides together, raw edge of collar to neck of shirt, all the way arouuunnnd the collar, back where you started, and overlapping a bit.

i found it easier to pin the beginning, pin the end (overlapping where i began by about 2”) and then stretch and ease the rest of the neckline/collar pieces together.

image

sew them together with a stretch stitch or small zigzag. flip the collar up into position, press the seam allowance down and top stitch around the edge.image

i tried it on at this point and fiddled with the collar a bit. once i got it laying how i wanted i tacked it in place.

now the waistband:

measure just under your bust.

now take a realllly, REALLY deep breath and check the measurement again.
divide that number in half, add 1” and that’s the length of the front half of your waistband.
that number in half plus 6” is the length of the back half of your waistband.

that 6” you’re adding is to give you the space you need to slip the dress off and on. if your bust to underbust measurements are significantly large (and i mean really, REALLY large. because mine is pretty large. so you must be a boobie monster)  you may need to increase it a smidge. i can wiggle myself into this—it’s not loose, but i’m not worried about busting stitches—and i have about a 7” difference between the fullest part of my bust vs. just under my bust.

i made my waistband 6” high, making it about 5” finished size. i kind of wish i had done it at 5”, giving me 4” finished size. look in the mirror with your tape measure and see what you think looks best.

image

so let’s say you measure 30” around just under your bust. then you take a deeep breath and it’s 32”. you’d cut one piece at 17”x6” (half + 1”)  and one piece 22”x6” (half + 6”). got it?

save yourself some trouble later and mark the center of each waistband piece, top and bottom. just fold it in half and put a little snip in.

now, we shirr.

wind the elastic thread on your bobbin. why yes, i do put my bobbin on my machine and hold the thread in my hand and wind it that way. most people say to wind it by hand. i’m a rebel. plus i’m impatient. ain’t nobody got time for dat. if you need more help on sewing with elastic thread, there are good references HERE and HERE.

sew lines of shirring across the length of your longer waistband piece. i did 10 rows of shirring spaced approx. 3/8 of an inch apart. that gave me about 3/4" seam allowance top and bottom.

image

then sew your waistband pieces together at the side seams, right sides together.

image

hmmm…sew at side seams. possible sewing blog name?

now you’re going to sew your waistband to your top. match up the side seams and the center front and center back (remember those little snips i told you to put in?)

you’ll probably have to ease the tank into the front a bit, and ease the waist band into the tank back a bit. remember: you want to attach the tank top ABOVE the first row of shirring! you want the tank and the waistband to all stretch when you’re putting the dress on!image

press your seam allowance up and top stitch. use a stretch stitch or a long straight stitch and gently stretch the fabric as you do this.imageSKIRT
cut two pieces of fabric: width of fabric x whatever length you want plus about 3” for  hem and seam allowance. better to go a little longer—you can always hem it shorter but it’s harder to add fabric back on. i cut my pieces 27” long.

again—mark the center of your back and front skirt pieces with a small snip.

if you want pockets cut out 4 pocket pieces also. what shape are pocket pieces? glad you asked. go HERE to see my instructions on pockets.imagesew your pocket pieces to your skirt, and your skirt sides together. run a gathering stitch around the top of the skirt.

i like splitting my gathering stiches into 4 sections—side seam to front center, then to the other side, then side to back center, and back center to the other side. i find it’s easier to control my gathering if it’s divided up a little more.imageonce your skirt is gathered to the same size as your top, fit them right sides together, lining up your center marks and side seams.

image

sew the skirt and top together. remember to sew the skirt to the waistband in the back BELOW the last row of shirring, so the skirt will stretch when you slip your dress on.
i generally do at least two rows of stitching on the waist, just for safety’s sake ;)
press your seam allowance down, and finish it off however you desire (pinking shears, overlock, leave it be…whatever floats your boat.)

imagelast steps: hem that bad boy and give it a final press. i do a 1/4” turn up and press, then a 2” turn up and stitch down so there’s no raw edges.
i put two buttons on the collar just for looks, but that’s totally optional.

thus concludes your sundress tutorial, as illustrated by googiemomma. i’m available for commission illustration work, fyi.

stick a fork in it cause that trash is done.
maybe not a fork. that’s weird. plus you did a lot of hard work. bare minimum: high five yourself.

i didn’t initially intend for this to have such a vintage look. but i guess a full-skirted sundress just kind of gravitates towards a vintage look. i don’t mind..add a big high sock bun and red lips for days and there you have it: one super simple sundress.

IMG_5015_edited-1

IMG_4980

sundress6

i am yelling at myself: STAND UP STRAIGHT!!!

IMG_4981

sorry for the wonky colors in these pics—my camera was very unhappy with the bright reds + dull grey bricks + overcast skies. and it literally started pouring as soon as we got out of the car. as you can see in the above shot.

IMG_4972
one last sidepoint: i had another spot in mind for photos, but ran out of time in the morning and didn’t get to go until after my kiddo’s dentist appointments (yes, i went to the dentist like this. i felt so 50’s housewifey). and by the time we left elliot was an hour late for her nap and the meltdown clock was ticking. so we went right across the street to the now-empty old walmart building. i thought the grey bricks and green grass would be cool.
well, i was right…the backdrop was fine. HOWEVER. i think we found the local drunk hangout, because the smell of pee was so unbelievably overwhelming that it was all we could do to get these quick shots before taking off. it was TERRIBLE.

which is also why i have to cut my face off in most of these shots. it’s me, throwing up in my mouth. blerg.

MELLY—thanks so much for letting me join the SUMMER SUNDRESS SERIES again! it’s so much fun! all you readers—have you checked out all the other awesome sundress action happening over there? you should!!

Pin It!

Wednesday, August 1, 2012

sweater to cardigan upcycle

remember this dress?

vintage dress (neve) 011

guinevere’s vintage pattern dress from a couple of months ago. we decided while working on it that some pops of yellow—a belt, buttons, and cardigan—would look super cute.
finding the perfect yellow cardi, however? not so easy. after trying one or two stores i just gave up and headed to the thrift shop, where we found this:

004_edited-1

a basic lightweight short sleeve sweater in a pretty pale yellow. done. i think it was maybe $2?
next we headed to joann’s, where i grabbed 1/4 yard of matching yellow cotton, and a $1 pack of yellow buttons.

i used the fabric to make some bias tape…

015_edited-1

next--take a deep breath and go for it…

018_edited-1

slice that baby right up the middle, top to bottom, just through the front (obviously)
i did a tight zigzag stitch on the raw edges, just as a preventative measure, then sewed the bias tape on to the raw edges, folding the excess under at the top and bottom to make a clean edge…

030_edited-1

for closure (and i mean literal closure, not some existential relationship-gone-sour type of closure) i just tacked the buttons on the top, and then sewed some hook and eye pair underneath. that way i o1) didn’t have to mess with making all those buttonholes and o2) didn’t have to worry about the sweater unraveling on me.

so the buttons themselves are just decorative, and the hooks and eyes are what do the heavy lifting.

vintage dress (neve) 008

vintage dress (neve) 009_edited-1

you can see the hooks and eyes a bit in these photos…i probably should have sewn them over just a smidge further, but…meh. ;)

vintage dress (neve) 007

i also took in the side seams just a bit—simply sewing a new seam from the armpit down. just to make a fit a little better.

and the belt was made with the same cotton used for the sweater binding.

easy!
Pin It!

Tuesday, June 26, 2012

sewing for the girls: altering blouses

blank

knit shirts. knit shirts. knit shirts.

such is the life of the big boobed woman. if you want to wear a blouse, it’s big and baggy—and totally unflattering--to fit the ladies.

want to wear a fitted button up blouse and skirt and be all saucy secretary?

enter: the gap-age.

and no, that’s not a hipster way of refering to The Gap.

Untitled-1

images via kaboodle and more.com

like an unreachable dream—the fitted—and fittING—button down.
no more, my friends.

just like earlier, we reference what not to wear—dress your largest part, then tailor the rest to fit. with that in mind i headed out to the thrift shop and found this little number:

IMG_0961

a vintage blouse with all the school teacher sass you need tied up in a bow around your neck (literally)

IMG_0959

but it’s kind of sad looking, no? it fits and buttons across my bust, but the rest???? :(

we’re going to fix that.

first things first: we say goodbye to the shoulder pads.

IMG_1298

the first thing we’re going to alter is the arms and underarm area.

i decided to make it 3/4 length sleeves, so i marked the new length and hacked off the rest.

IMG_1314_edited-1

then we need to trim up the underarm and sleeve bagginess.
all i did was turn it inside out and run a new seam about an inch inside the existing seam.

IMG_1315_edited-1

i started about halfway down the bodice, gradually tapering in and going under the armpit and down the sleeve in one go.

that helped tremendously, but we still need to fit the bodice and back of the shirt more. what we’re doing is marking and creating darts on the shirt where there were none.

because this is a button-down, you can’t put it on inside out to mark where the darts should be. so here’s how to do it:

put the shirt on and mark and pin two front darts. just pinch the fabric under your bust until it looks good. try and keep them even up and down, and pinch an even amount of fabric in each.

IMG_1290_edited-1

pay attention to the fit of the entire shirt—you still need breathing room and ease so as not to create gapage in the front placket.

IMG_1292_edited-1

here are my pinned darts. three pins: the top, center and bottom.

do the same to the back of the shirt. this will require one of three things: major flexibility, a helper, or a dress form (which is what i used)

IMG_1294_edited-1

again keeping the darts level and even.

IMG_1295_edited-1

once you have the darts all pinned, check the side seam to make sure it’s still straight. that’s a good gauge to make sure you’re not pulling too much from either the front or the back.

IMG_1297_edited-1

once everything is pinned and checked and you’re happy with the fit it’s time to transfer your markings to the inside of the blouse.

inside the shirt you have the fabric pinched together where you pinned it.

IMG_1299_edited-1

use a fabric marker to make an “x” across the fold of fabric on the reverse of the center pin.

IMG_1300_edited-1

then straighten out and mark the top and bottom points of your dart with the fabric marker.

IMG_1301_edited-1

now you can unpin your shirt and you’ll have marks on the inside for your darts.

IMG_1302_edited-1

all you have to do is match your center marks up again, right sides together this time, and sew in your dart—going from top mark, tapering out to your center mark, and down to the bottom mark.

IMG_1310_edited-1

my darts (and your darts) may not look completely even (with the widest part in the center of the length of stitching) but that’s okay. it’s because we’re compensating for a large bust.

press your dart well, ironing the excess towards the center of the garment.

and that’s it! try it on and admire your handiwork!

i sewed the original cuffs of my shirt back on the sleeve at it’s new 3/4 length. add in a black pencil skirt and some red heels and BAM!

IMG_1462_edited-1

hellooooooo awkwardly posed secretary lady!

okay, so i can’t pose. and i cropped off my funky face for both of our benefits.

IMG_1410_edited-1

you’ll notice that i do have some pulling in some of these photos. that’s because besides being blessed overmuch in the top part, i’m still a nursing momma…so these pics were taken right before elliot had lunch and my magical growing boobers were larger than normal.

IMG_1444

IMG_1439

but the overall fit is tons better than where it started, and i’m happy with it.

IMG_1413

and this last photo…well, it’s clearly not something meant to be posted on the internet.

BUT. it shows how well the top still fits without gapping in the front placket. so, look at the boob area, and not at my face. (and file that under “Sentences I Never Thought I’d Say”)

IMG_1472

yes, my husband took this picture. and yes, i was striking a pose. and if this is what i look like when i’m flirting with him it’s a wonder he married me.

so let’s wipe that last image from your mind. this should be your takeaway from this post:

Untitled-1

Pin It!

LinkWithin

Related Posts with Thumbnails