
S E W I N G N O T E S your only supplies are:
+ a pile of knits. somewhere in there try to have a thicker white cotton. i had a rib knit white tank, and this was perfect as a liner for the crotch. (i just said crotch. on the internet)
+ elastic. legs: (2) 12 1/2” pieces, waist (1) 18 1/2” piece. i used both F.O.E. (fold over elastic) and regular 1/2” elastic that i have on a big spool. the F.O.E. does look nice and professional, but i found the regular stuff much easier to work with.
+ scissors, thread, machine, pins. what you don’t need is a serger. it’s nice if you have one, but you can do these perfectly well without one.
+ this pattern, if you want.
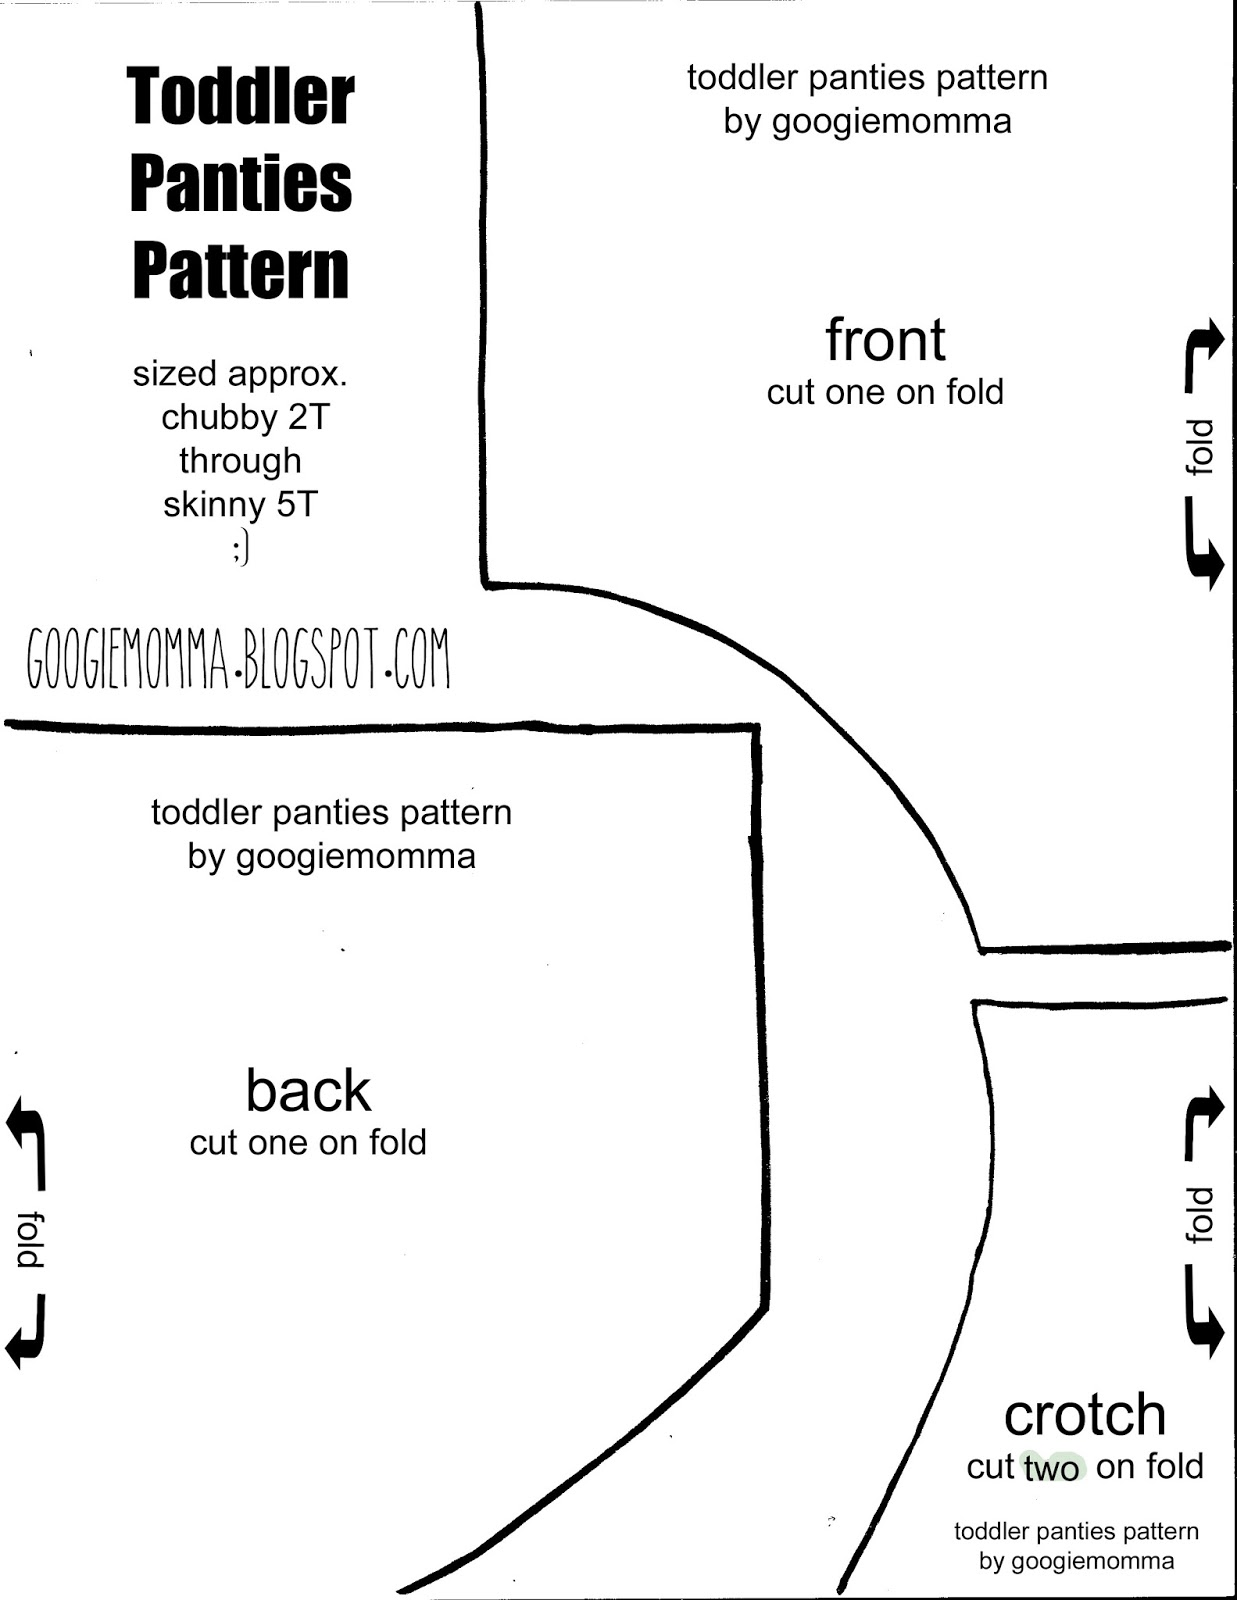
(right click and save. print full size with no scaling)
+this tutorial!dig through your knits and find some you want to use. the beauty of this is that you can use whatever you have. newsflash: striped panties are waaaay cuter than character ones. trust me.
old t-shirts, yoga pants—anything knit works. yardage varies. i played with my pattern pieces to get as many as possible from each item of clothing i used.

print out your pattern and cut out pieces. each pair needs a front, a back, a crotch from the outer fabric and a crotch from a decent plain white cotton. i just cut random pieces from coordinating knits for a mix-n-match look.

everything is sewn with approximately a 1/4” seam allowance. you don’t want big giant seams riding all up in their stuff, you know?
if using a regular SEWING MACHINE: when sewing elastic to fabric, use a small stretch stitch on your machine. when sewing fabric to fabric use an overlock stitch (see step 1)
now we sew.
 sew the crotch
 if you are using a SEWING MACHINE: wrong sides together, sew both crotch pieces at front and back with a fake overlock stitch. it’s the one that looks like this: /__/__/__/__
if you are using a SERGER: wrong sides together, sew at front and back.
don’t worry about the side seams, they’ll be enclosed by elastic.
 sew the pieces together
SEWING MACHINE: match up the front panel to the crotch front and sew right sides together. repeat with back.
SERGER: same as for a sewing machine, or alternately you can do the first step (sew the crotch) and this step all together. if you gots mad serger skillllzzzz (which i do not.)


this pair i did with my serger. but i’ll be honest—i found it easier to use the regular sewing machine for these.
 sew the leg elastic
(2) 12 1/2” pieces of elastic
fold in half and mark the center with a pin. match up the pin with the notch on the crotch of your panties. i pin it there, then at both ends and stretch to fit as i sew.

if using REGULAR ELASTIC: sew the elastic to the wrong side first, with the elastic overhanging the fabric by a little less than 1/4”. then fold the elastic over to the right side of the fabric (enclosing the raw edge) and topstitch close to the edge of the elastic.


if using F.O.E.: 2 ways. first, if you’re a sewing baller you can enclose your raw edge in the F.O.E. and zigzag away. one step and done.
i am not.
i do it in 2 steps—sew the fabric to the back side of the F.O.E., then fold it over and topstitch. if you can master the One Hit Wonder of F.O.E. Sewing…well, can i have your autograph? and also it’s a really professional and quick way of finishing these. so it’s probably worth the effort required to become Grand Master status. you probably also have those mad serger skilllzzzz. so WHY ARE YOU WASTING TIME ON THIS?

(NOTE: the above photos are of the waistband, but that’s just because i’m using them to illustrate the F.O.E. technique. you haven’t missed the “sew the waistband” part. carry on…)
 E M B E L L I S H
 at this point you can add any cute little octopi you’ve snagged off stained t-shirts in your upcycle pile, too. or not, because your kid will probably stain these with poo and you’ll chuck them in the garbage. whatever. YOU’RE NOT THE BOSS OF ME.

 sew the waistband
(1) 18 1/2” piece of elastic
now we have lots of options.
first: regular elastic or F.O.E.? either way is fine, i used F.O.E. on these just to show both types of elastic in my sample pair. sew it the same way you did the leg openings.second: you can choose to sew one leg opening shut and finish the waist, then complete the 2nd leg opening; or sew both leg openings and then finish the waistband.
i find the 2nd option slightly less fiddly. so until you get the hang of it you may want to start there, even though it doesn’t give quite as nice of a finish.
to sew BOTH LEG OPENINGS AT ONCE: match up sides, and sew right sides together with slight stretch stitch. if you’re not using a serger, you’ll want to finish the edge with a zigzag, or sew with the faux overlock stitch.
METHOD 1
sew your elastic ends together.

center the seam and mark both sides of the elastic with pins. match the pins up to the side seams and add additional pins as necessary, stretching the elastic to fit. sew.


boom. crazy cute panties.

METHOD 2
to sew ONE LEG OPENING AT A TIME: match up ONE side, and sew right sides together with slight stretch stitch. if you’re not using a serger, you’ll want to finish the edge with a zigzag, or sew with the faux overlock stitch.

open out the waistband of the panties and pin the elastic at each end. add additional pins as necessary to keep it even. sew.

match up second side seam, sew right sides together.
boom. crazy cute panties in multiples.


with cute little bums.


I can agree with SO much of your post. I hadn't realized how useful sewing something like undies could be! BTW your writing style was cracking me up. I kept saying in my head- "You're not the boss of me!" knowing that if I said it too loud and laughed too much at it my 5 yo would surely think that was an opening to repeat it. :/ Thanks for the pattern!
ReplyDeleteMae
www.thelifeofacompulsivecrafter.blogspot.com