Showing posts with label quankets and blankets. Show all posts

Monday, June 3, 2013

star wars…it’s nothing but star wars

i’m not a star wars fanatic. i just…don’t get it? sorry. i know it’s a big deal to a lot of people. but its just not my bag, doll.

that doesn’t mean, however, that i’m not up for a star wars related challenge. because—while i may not be a star-wars-ophile (is there a name for SW lovers? like a “trekkies” equivalent?)—i do love me a good challenge.

and a client came to me with this: good friends, expecting their first baby, a girl, total star wars fans, can i do a quilt that is girly—but not too girly—with a star wars theme?

turns out, i can.

star wars quilt2

we browsed some online fabrics, and agreed that this comic book style one was our fav. and that’s all the direction i had.

star wars quilt1

oh-and a minky backing. she liked that.

so i got the star wars fabric, and then had the toughest time finding anything that coordinated. the blue isn’t quite navy, the white isn’t quite white. any navy fabrics didn’t match, any white fabrics made the off-white look dirty.

star wars quilt4

but perseverance pays off. perseverance—and lots of hours in joann’s. i found two pink prints and one blue print that matched, and decided on a random block type quilt, with simple quilting in the blocks themselves.

star wars quilt5

a fuzzy pink minky backing and small star wars patch made the back.

can we talk about the binding too?

star wars quilt8

that’s right. i showed those mitered corners who’s the boss. boo-yah. (pats self on back).

and after trying (and rejecting) approximately 400 different ways of machine sewing the binding on the back side, i finally gave in…

star wars quilt7

…and hand sewed it. (pats self on back again, and gives self a cookie to boot)

i was pretty stinkin’ happy with how this turned out, and so were my clients. they couldn’t wait to gift it at the upcoming baby shower.

star wars quilt3

ava photobomb. she was so happy to be my quilt holder for these pics. NOT.

and in my best tv infomercial voice: BUT WAIT! THAT’S NOT ALL!!! i made two other items for this baby gift! and one will be up tomorrow! so come back and see my next star wars baby item then!

Pin It!

Tuesday, March 19, 2013

baby, baby, baby twooooo

as it turns out, the issues with getting the rest of the post about elliot’s doll have less to do with a) the length of the post or b) me actually writing the post or even c) me actually photographing the rest of the stuff i made her and more of d).

‘d)’ of course being “photographing the stuff without elliot trying to be in it”

IMG_4249IMG_4250IMG_4251

although the doll and bed were presented as one unit, she’s thoroughly convinced—in the headstrong oblivious-to-reality way that only a toddler can fully muster up—that this tiny bed is for her to nap upon.

she gets pretty bent out of shape if you try and put Baby in. it was a fight to get even a couple of shots that did not include her valiant attempts at folding her body in such a way as to be comfortably ensconced on that tiny poster bed.

but i did manage a few.
IMG_4267

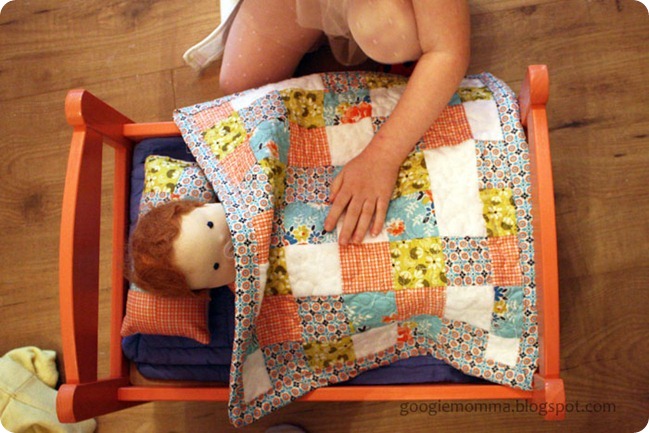
Baby got a sweet little wooden bed from IKEA. for $20 it comes with the dark blue “mattress pad” and “pillow” and a little plaid blanket.

image

duktig image via IKEA site

it came home like the above picture, but it got the googiemomma upgrade: a paint job, new quilt and coordinating pillow.

IMG_4265

when i bought the fabric for the little quilt at joann’s i glanced through their spray paint selection for a color that matched. oooh, coral isle. perfect. but our joann’s keeps the spray paint under lock and key, requiring an employee to come to your aid. because you know, all the rowdy graffiti arteests and inhalant huffers head first to joann’s for their drug/tool of choice. :/

anyway, the other issue is that they charge $8 a can for spray paint?!?!?! one can only assume they are not familiar with the pricing of spray paint in the rest of the world.

puh. i’ll show them. i’ll just nip off to the local walmart…err…sears hardware…nope, maybe a.c. moore?…nooo…lowes? strike 4.

NO ONE, i repeat NO ONE else apparently carries krylon spray paint in coral isle.

image

(do you follow me on instagram? cause i’m pretty much the awesomest instagrammer ever.)

i drove around for an hour before sheepishly heading back into joann’s. come to think of it, maybe that’s why their paint is under lock and key. all their exclusive colors are the craft world equivalent of gold blocks.

regardless, i got my paint (40% off coupon whatwhat!?!) and that stinkin’ bed sucked up the ENTIRE can.

i bought a fat quarter pack of d.s. quilt fabrics (also with a coupon making it only $6) and a 1/2 yard remnant of white fleece for the tiny quilt and pillow.

IMG_4276

IMG_4270

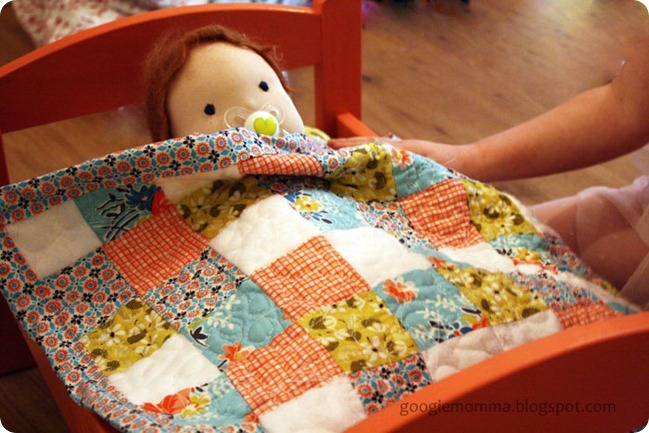
i did 8 squares of each pattern and 16 white fleece squares, all cut 2 1/2” square. the back is solid white fleece and i free motion quilted in a random squiggly pattern over the whole thing.

image

that gave me fits—almost enough to turn me off of machine quilting for good. but after consulting with some Super Quilter Friends (similar to the Super Friends just more cozy and covered in thread bits) i’m thinking the thread i was using is the biggest issue.

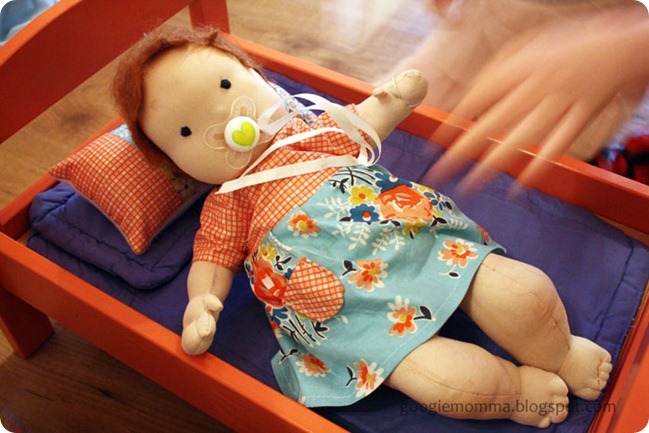
anyway, it was done and i had fabric to spare, so why not whip up a little matching dress for Baby?
IMG_4261

a simple little dress with a back velcro closure, and i attached the magnetic binky to the dress with the ribbon that came wrapped around my fat quarter pack (waste not want not, amirite?) now we have no loss of the binky and a perfectly coordinated set.
IMG_4263

snug as a (handmade) bug in a (quilted) rug.

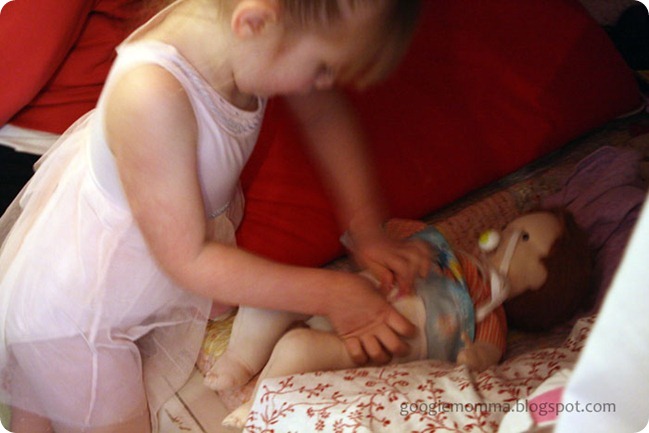
now get that baby out. it’s time for elliot’s nappy.

image

so that’s it. one baby doll, two clean diapers, one poopy diaper, one bed, one pillow, one quilt, one dress, one magnetic binky, oh! and one fabric tissue box thingy with six squares of the leftover white fleece inside—boom! wipes.

IMG_4274

haha! forgot about that. i just cut the remainder of the white fleece from the back of the quilt into square-ish shapes and serged the edges. the little container is a basic little box that velcros closed on top and has a hole cut out so the “wipes” can pop out.

okay, now that’s really, really it. Baby is quite happy in her new home, the recipient of much love and many rather rough diaper changes. and that’s just the way i like it.

IMG_4271IMG_4277

Pin It!

Tuesday, February 19, 2013

i dub thee, the “quanket”.

so i knew i was lying, even when i said it. i even entitled my post “promises i don’t intend to keep”, because i could feel it in my bones—like crochet and sewing clothing and ::coughcoughmakingbabiescoughcough:: quilting was something i was going to return to.

but (and it’s a big but) in my head i’ve broken quilting into two vaguely defined categories: the traditional types of quilts, and a more modern or contemporary quilt. i’ve been lurking on quilting blogs and quilt pinterest boards, and i’m starting to see a pattern to the types of quilts that catch my eye.

it’s that second type i’m digging. that blend of the traditional art of quilting and the more simplified color schemes and patterns. i’m down.

so, another quilt it is. was.

IMG_3920

a gift for a friend’s soon-to-arrive baby boy. the room’s design is beachy—but not babyish beachy, more soothing vintage nautical—like how you’d decorate your actual beach house. you know, if you were awesome and had a beach house. (that i’m certain you’d invite me to, cause we’re cool like that. right? right.)

IMG_3918

i was stressed beyond all get out choosing the fabrics for this thing. the momma and her hubs have a very clean, minimalist vibe that i wanted to honor in my choices for the blanket. something youthful and appropriate for a baby’s room, but not too juvenile.

i even made the momma’s sister come with me on one shopping trip to help gather the initial fabrics. (sidenote: hey meg—guess where the last $8 of your gift went? that’s right…you kind of paid for some of your own blanket)

IMG_3910

in the end, with a simple scheme of grey, navy and white, i think it all came together.

IMG_3911
i kept it super simple: straight horizontal bands of fabric broken by a solid white vertical stripe and blocks on one side.

IMG_3912

and then i’m pretty sure i broke some kind of Quilting Rule, because i did the back in minky.

IMG_3913

and now this is where i get lost. because my simple little straight stripes and minky backing bear little if any resemblance to some of the quilted works of art i’ve seen. quite honestly i just don’t feel right calling this a “quilt”. but, well, it’s more than just a “blanket”, right?

IMG_3914

(sidenote: hey meg--this spot with a little whale on the back? this is where HIS NAME WOULD HAVE BEEN. IF THE POOR CHILD HAD A NAME. ahem. i was forced to pursue an alternative course.)

either way—it’s got a top and a bottom and organic cotton batting in the middle, and i quilted it in a whale pattern (UGH!) because i said to guinevere hey, i can quilt this in straight lines, or crazy lines, orrrr i could trace a whale shape all over and do that and she was like THE WHALE DO IT DO IT DOIT!!!

cut to me 3 hours later with soooorrrrre shoulders and hands permanently in a claw-like position. (sidenote: hey meg--shannon is technically a unisex name. THREE HOURS OF WHALE STITCHING. just sayin’)

IMG_3915

so yeah, i kind of blame guinevere for that. but i think she was right because the whale quilting is subtle but fun. it kind of looks like paisley at first but nope. i remembered it’s not the 80’s.

IMG_3916

slap a tag on it, it’s done and done. the googiemomma quilts. again.

the shower was delayed a couple weeks due to family sicknesses, so this guy ended up sitting on the back of the couch for a while. i’d be lying (again) if i said i didn’t curl up under it once. or twice. and consider keeping it. it’s pretty much perfect for snuggling under and reading in the corner of the couch.

but i don’t have a nautical theme in my living room, so it went off to it’s new intended owner.

and just so i don’t leave you with the wrong impression—yes, the quanket was technically “done” a couple of weeks before the shower, but you know i was putting the last few stitches in a couple of spots on the binding the day of the shower. just keepin’ it real.

sidenote: hey meg—just kidding. name him whatever you want. but i’ve totally already named him sailor in my head. ;)

Pin It!

Thursday, May 7, 2009

fluffy bunny blanket {free pattern + tutorial}

how about a quick and cute sew for all the newborn babes in your life? or maybe a giant sized one for yourself, just because?

IMG_6722_2555bunny blanket

let’s get going…

+supplies+
-1 yard minky*
-1 yard flannel/other backing fabric*
*the minky i bought (from joann’s) is slightly wider than the flannel, so i had a bit of excess yardage of the minky to make the bunny head and arms from. if your two fabrics are the same width, i would get an extra 1/4 yard of the one you’ll be making the bunny from.
-small amount of stuffing
-small bit of embroidery floss
-thread, notions, etc.
-this pattern…

bunny pattern piecesbunny pattern

(right click and save to your computer. print at 100%)

+sewing notes+
this pattern includes a 3/8” seam allowance. i also recommend serging or zig-zagging your seam allowances to reinforce. hopefully your bunny will be getting lots of love. ;)

+instructions+
cut out all your pattern pieces:

IMG_6702_2535bunny blanket

sew each ear up, right sides together, along the long and curved edges. leave the bottom open for turning, and turn them right side out.
sew each arm up, right sides together, along the long and curved edges. leave the bottom open for turning, and turn right side out. lightly stuff the arms and baste them closed.

IMG_6703_2536bunny blanket

set your arm and ear pieces to the side and get your three head front pieces.

IMG_6705_2538bunny blanket

*optional: to help with attaching the back of the head later, fold the center head piece in half and mark the middle of it with a pin or small snip in the seam allowance.

now finish off the head front by adding in the chin piece.

IMG_6706_2539bunny blanketIMG_6707_2540bunny blanket

IMG_6708_2541bunny blanket

now to attach the front of the head and back of the head…

IMG_6710_2543bunny blanket

you’re sewing from one bottom corner of the neck, up and around the head and down to the other bottom corner of the neck, leaving the neck bottom open.

IMG_6712_2545bunny blanket

now you need to attach your unstuffed bunny head to your blanket! i cut my two pieces of fabric (the minky and the flannel) into equal sized rectangles. set the flannel (or whatever your backing is) to the side and continue…

IMG_6714_2547bunny blanket

IMG_6716_2549bunny blanket

i simply eyeballed where to put the arms. i found i liked them better fairly close to the head.

attaching the backing to the blanket…

IMG_6717_2550bunny blanket

make sure the head, ears and arms are safely out of the way when you’re attaching the blanket back. you can pin them out of the way if needed.

IMG_6718_2551bunny blanket

IMG_6720_2553 copybunny blanket

i used pins to play with the placement of the eyes and nose. it’s amazing how moving them up or down a smidge changes the whole look!

and there you have it. i think there’s a ton of ways to play with this pattern: add a bunny head to a beautiful baby quilt, shorten the ears and make him a bear, cut the blanket down to make a little toy…i’d love to hear any other ideas you come up with---or any finished projects you make!

Pin It!

LinkWithin

Related Posts with Thumbnails